In my opinion, the movie corporation needs to wake up to the 21st century and realize that formats like DVDs and Blu-rays are dead. When it comes to Google Play and iTunes the prices these companies charge for movies is bloated at best in my opinion. I can compress Blu-rays down to 1.6GB on average with a nearly unnoticeable quality loss. As far as I’m concerned, there is no reason not to compress data. As a proof in point, the newer HBO series Silicon Valley is a company that has some extremely good compression logarithm. My final point that they don’t know what they are doing, is that it is easier to torrent a film rather than to obtain a legal copy.
To get around all these problems I’ve turned to Amazon.com‘s used Blu-ray’s and two programs, Handbrake.fr and RedFox to solve nearly all of my problems. I compress Blu-ray, or DVD, using the H264 format into an MKV (Not Mp4 and I’ll explain why in a bit) video file. I’ve been doing this for years with great success, but only recently have I found all the settings that just work better than the rest.
First up, get the program AnyDVD (RedFox instead now) so that you can get past the encryption on the Blu-ray. Otherwise, I would never get anywhere trying to rip my Blu-rays because the files would be corrupted.
I use MKV for one reason because MP4 cannot handle multiple Subtitle files. When ripping a video you need two Subtitle tracks, one for Foreign Languages and the other for full subtitles. This way if want the watch the video without audio, or if one of my Deaf Friends is watching, I can enable it and enjoy the video. Whereas the Foreign Language Subtitles show up by default so that I’m not guessing what they’re saying in a different language.
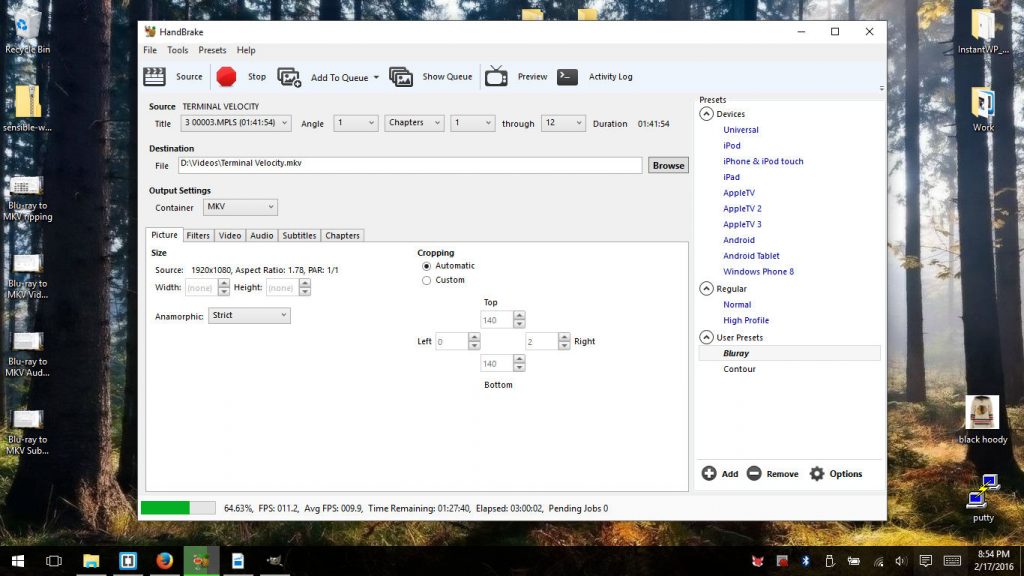
The first tab is the Picture settings, which is one of the easiest for me to set up to my liking. Normally, I’m ripping a Blu-ray and I want Blu-ray quality so I set the Anamorphic to “Loose” and Modulus to “2” because I want all my pixels. Make sure to let Handbrake take care of the Cropping Automatically so that your computer isn’t encoding Black bars at the Top and Bottom or Left and Right of the video. Blu-rays are still a victim of needing to be cropped, just today I was surprised when I found “Beerfest” had just blank black bars at the top and bottom of the video. What a waste.
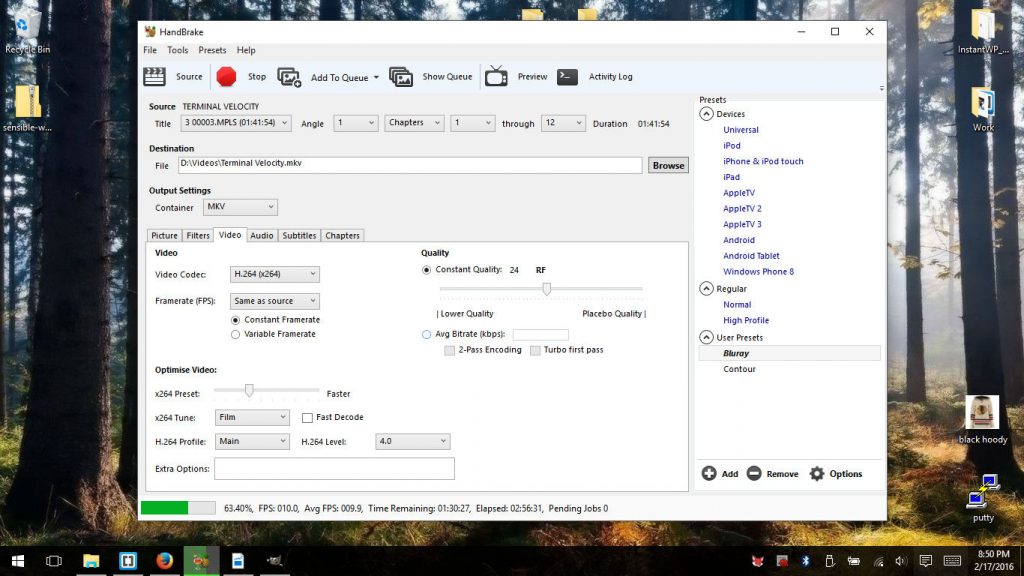
When it comes the Video quality, I’ve gotten the best results using Constant Quality set at 24 for Blu-rays. Someone could make a good case for 23 if they didn’t mind a slightly bigger file size. For DVD’s set the Constant Quality at “21” to balance quality and file size. I keep the Frame Rate constant and set it at “Same as Source”. In the Optimize Video section is where I’ve personally lost a lot of time and sleep over. Basically, the Optimize Video Section works best when it set at “Slower“, the Tune is for “Film”, the H.264 Level set to “4.1”. I could explain for hours why I choose these settings, but summing up the options I choose is what I prefer.
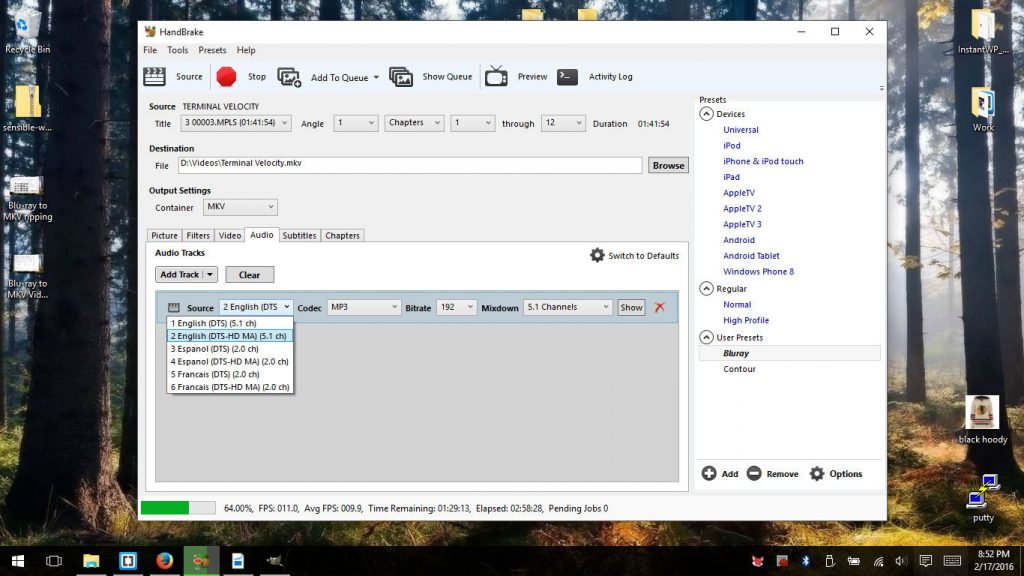
Next up on the list is deciding on what format to encode the audio with. In the past, I just used passthrough, which is just a perfect copy of the Blu-ray or DVD audio file. With time I found my file sizes bigger than what makes sense for me as my digital video library grew. FLAC held my interest too for a while, but after some lengthy debates with myself, I decided the file size is still too big and the quality difference just isn’t worth it. I’ve settled on the MP3 format now because of the following reasons. When an MP3 is encoded at 192 kbit/s it becomes very difficult to tell the difference from some of the best formats out there. Note that 320 kbit/s isn’t worth it, when someone does a double-blind test, odds are that they cannot tell the difference. I use the Mixdown setting “Dolby Surround” as a way of retaining some surround elements from the video.
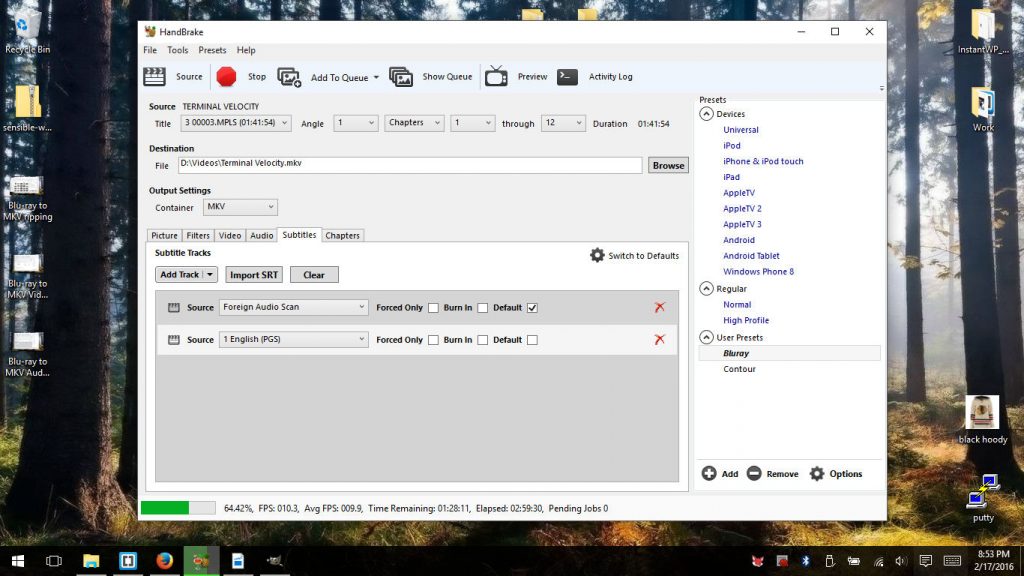
Subtitles are a bit tricky to get right, but I’ll do my best to explain. The picture above is a Blu-ray where they are still using the boring old DVD formats. Normally, I just need to add two tracks of the “1 English (PGS)” and only check mark the boxes “Forced Only” and “Default” on the first track only. This way I get both subtitles for languages not in English, and the ability to turn on subtitles for the entire film. Well, the movie Terminal Velocity is an old movie, to say the least. Because of the archaic DVD format, I needed to set up the foreign audio choosing “Foreign Audio Scan” and just check marking “Default”. Notice I do not select the “Forced Only” because I would get nothing to display if I choose that option. This way whenever I play the video the default option is to display subtitles for words, not in English.
As long as someone uses the same settings I show above, they will have a format that loses none of the features and is capable of being played on nearly every device. There is no need for programs like VLC so the video is even playable this way either. These videos will be hard to distinguish from playing the actual Blu-ray it’s ripped from or new MKV file just made. Best of all, these MKV files are very portable at this size. They would easily fit on a standard DVD 2-4 times being dependent on the length of the film. I find Blu-rays to be a complete waste, but on the other hand, the companies sure have made it easy for me to get a high-quality digital copy of my favorite videos. Anyway, don’t forget to comment below for any help with backing up your Blu-rays, and/or DVDs, by commenting below.
Blu-ray to MKV (MP4) Using Handbrake

Modified:


Leave a Reply